Sunday, January 3, 2016

Make Your Own Handmade Kidney Ear Wire Tutorial


Kidney Ear Wires


Hello. Today I'm going to show you how to make your own kidney ear wires. I have two styles so it's going to be a little long. The first style has a double wire hook that wraps up onto the wire and the second is a little more basic and is perfect for more minimalistic designs.


For both styles I started with my basic tools. Here I used half hard 20 gauge wire, my rounds pliers, and my metal cutters. I also got together a couple of objects that I could use to form the loops of the ear wires. I have experimented with many different dowels and other objects but I really like the size of the sharpie marker for shaping the kidney ear wire. It creates a nice round loop that isn't too big or too small. Plus I always have one around anyway so it's handy.


Doubled Hook Kidney Ear Wire


To start you need to cut two pieces of 5-6 inch wire. I only show how to make one, but if you want to make a matching pair I suggest manipulating both wires at the same time through every step. 


Start by measuring the desired length of the ear wire. This end will be the shorter end because you need extra length on the other end to form the hook.


Then grab the longer side Abbott 1/4 of an inch above where the shorter side ends and wrap it around one side of the pliers so it crosses over the top of the wire.


Measure how long you want your hook to be and make sure to add some length to bend the end to form the hook. The bend the wire straight back an press it together to form a tight bend making a strait section of double wire that crosses over the top of the main wire again. 


Start bending the remaining wire over and under the main wire so it is now facing the center and is underneath the original wire.


Continue wrapping 2 or more times depending on how much wire is left or how many times you think looks good. I cut my wire a little short and was only able to wrap it around twice. 


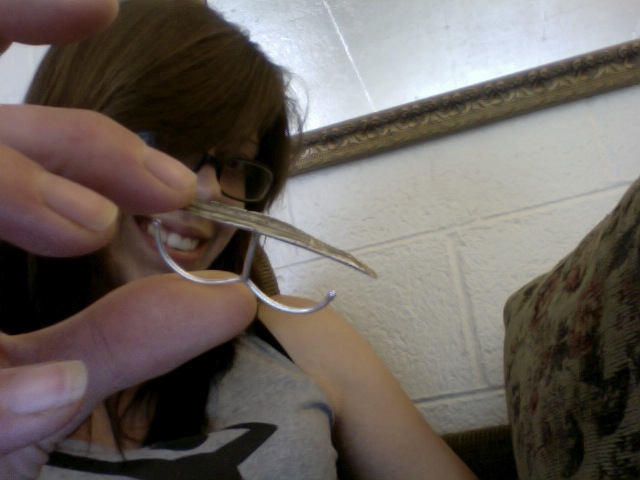
Grab the end of the straight double wire with the round pliers and curve the end until it makes a nice hook. Make sure not to bend it too much. You want the end of the hook to easily fit in this hook. 


Then just grab the wire and bend the end of the loop out using the hook you just created as the tension point. It should be enough that it make it easy to put into your ear but not so tight of a bend that it is uncomfortable to slide your ear over the bend. Around a 30-45 degree angle is good.


Cut off any remaining wire so that there is about 1/4 of an inch after the final bend in the hoop. This length can vary depending on what style  you are going for, but a general rule of thumb is that it should be at least as long as the average width of an earlobe. 


After cutting off the excess wire you can file the wire flat and then sand the edges to create a nice smooth and rounded end. It is best to file the wire down flat first and then sand the edges with a fine sand paper (at least 600 grit) to create a smooth slightly rounded end. This is one of the most important steps for making any ear wire. This is the part of the wire that people will feel the most. If it is rough and irritating they might not like wearing the earring no matter how beautiful it might be.


Minimalist Kidney Earwire


For this design start with the same tools as the previous one and two 5-6 inch long pieces of half hard wire. I bent the wire in the same way around a permanent marker and now will begin shaping it.


Startby grabbing the long side of the wire about 1/4 of an inch above the  where the short side ends.


Bend it outwards to prepare to make an eye to atatch the earring onto.


Reposition the pliers so that the pliers tips are on either side of the bend you just made. Bend the wire around the bottom tip of the pliers until it forms a nice loop.


Reposition the pliers again so that one of the tips is in the eye you just made and the other is on the innermost side of the remaining wire. Then bend the wire over the tip until it is flat.


Here is what it should look like so far. If it's not entirely flat, now is a great time to flatten in out by gently hammering it or using some flat pliers.


Measure how wide you would like the ear wire to be starting from the outer hoop and grab the wire at that length. Bend the wire sideways around the pliers to creat you hook and cut off any excess wire.


Insert the loop into the hook using the hook as tension bend the wire out slightly. It should be enough of a bend to make it easier to put into your ears but not bent so much that it's uncomfortable to put the bend through the ear. About 30-45 degree angle is good.


Cut off any remaining wire so that there is about 1/4 of an inch after the final bend in the hoop. This length can vary depending on what style  you are going for, but a general rule of thumb is that it should be at least as long as the average width of an earlobe. 


If you made it this far I hope you enjoyed it. This post turned out to be kind of long. I would love any feedback and would really like to see any jewelry that you make using this tutorial or not.
Thank you and have a great day!

Lyndy

Saturday, January 2, 2016

Making Tradition French Hook Earwire Tutorial

French Hook Ear Wires


These were the first ear wires I learned how to make in school. They are really easy to make and you can make so many variations that can go with any earring. 

I started out with 20 gauge half hard wire, round pliers, metal snips, and few different shaped objects to bend my ear wires around.


I Started of by cutting a piece of wire about 6 inches long. To make a pair I suggest cutting two wires that are the same length and manipulating both wires at the same time for each step. 

The length will depend on how long you want the ear wire to be and what you are wrapping it around. After a bit of experimentation you will find the perfect length for your wire. After you find a good length it helps to write it down somewhere so you remember for next time. Right now is also a good time to file the end the wire that you are starting out with flat. It just looks cleaner in the end.


With the round pliers make a small loop in one end of the wire. Try to make it connect to the wire as tightly as possible. This is where you will attach it to the earring so it needs to be high and secure.


Reposition the pliers so that one end is in the eye you just made and the other is touching the wire that extends from it . Bend the wire so the eye is centered coming out of the wire like the picture below.


Now you can bend the wire above the eye to prepare to make the loop. This length you go up before the bend will vary depending on how long you want the final ear wire to be. You can start right above the eye if you want a short ear wire or go longer than this example as well. You can also skip this step and go directly to bending the wire further down the wire for a long sleek ear wire like the longer ones pictured in the beginning of this post. 


Here I chose a highlighter to bend the wire around. I like the round look and the bigger hook that it gives me in the end.The goal is to form the wire snuggly around your object so the wire take its shape. I usually hold the wire at the eye or the base of the bend and using a bit of tension from the other hand pull the wire over the object. If it's an angled object I might also use my fingers and press down firmly on any corners to create crisp edges.


Here is what it looks like directly after you bend the wire.


To make it easier to insert into the ear, I take my round pliers and bend the wire out from the loop a slight angle. You don't want to make the bend to tight or it will make it uncomfortable went  you try to thread it through your ear around the bend. You also want to make sure that there is enough room between the end of the wire and the eye end of the wire for people to thread their ear through. If its to close the can't get it on without bending the wire and deforming the loop.


Next I sniped off the remaining wire about 1/4 -1/2 of an inch away from the final bend.  There is no specific length for this, but you want it to be at least as long as the thickness of an average earlobe. Here is what the final ear wire will look like.


The  final step is to file and sand down the end of the wire. Its best to file the wire down flat first and then sand the edges with a fine sand paper (at least 600 grit) to create a smooth slightly rounded end. This is one of the most important steps for making any ear wire. This is the part of the wire that people will feel the most. If it is rough and irritating they might not like wearing the earring no matter how beautiful it might be.


Here are some more examples of the different shapes that can be achieved using basic objects around the house. In school we had different sized dowels that we would use specifically for this purpose, but I like to get creative and use things I have around the house. I encourage you to do the same. Once you have experimented a bit with different objects you will find that you like how some turn out better than others.

Hopefully this was helpful to anybody wanting to make some earners. I would love to see what shapes you create and the beautiful jewelry that you hang from them. Feel free to leave any comments or suggestions as well.

Thank you everybody!


Friday, March 23, 2012

Silver Ring Made From A Cast Blade of Grass


I also started to make some of these rings a little while ago. I cast blades of grass in silver then made earrings and rings out of the pieces. I happen to love the whole blade of grass texture, but I must admit that it is a little bit different. Also the floating piece of metal on your hand is interesting enough to get a few people to wonder what it is. 

Wednesday, March 21, 2012

Work I Made as a Student


Seeming how I just started this blog here are a few more things that I have made recently.